Writing Sound - 1
I’ve been making music for years, but I’ve never written about it. Writing a “sound design blog post” feels strange—the best way to explain sound is through sound itself. (Yes.) But here I am, decided to write. Partly to clear my head, and partly so that anyone stumbling upon this site doesn’t wonder, “What does this guy have to do with music?”
My relationship with electronic music dates back to when I was 19. Back then, I didn’t exactly know what I was doing. YKS stress on one side, and on the other, I was hearing things, I had ideas in my head, and I wanted to materialize them as sound. Not exactly a romantic origin story.
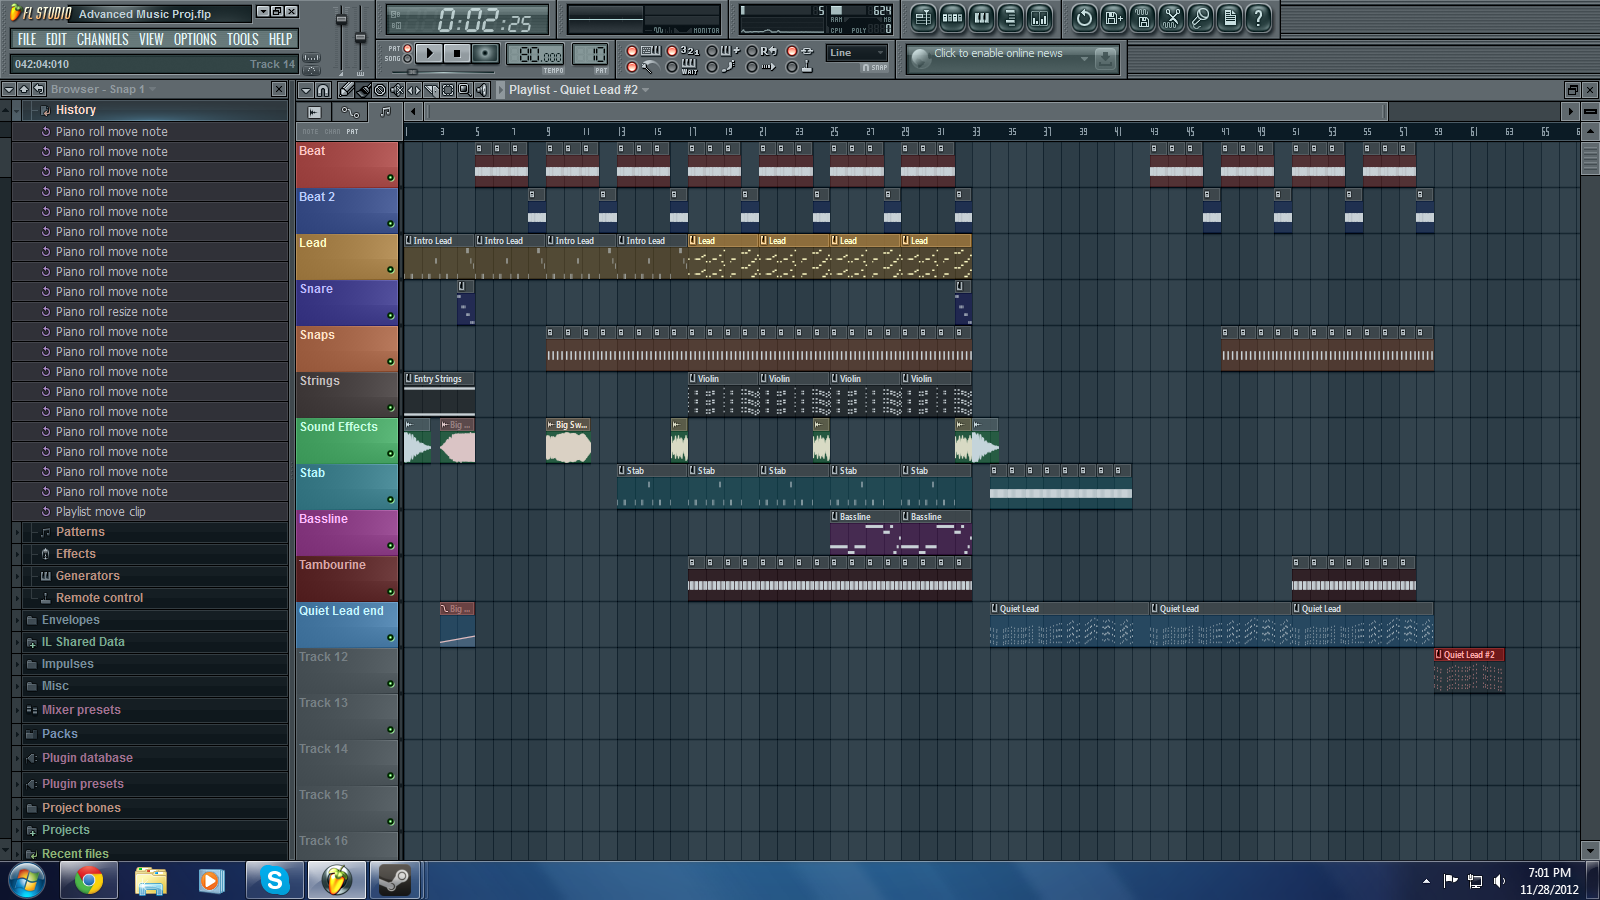
I started with FL Studio. If you start making electronic music in Turkey, you find yourself with FL Studio open—I don’t know how it happens, it just does. I spent a few years there. Most of it was terrible, some of it was slightly less terrible.
Then I switched to Reaper. Reaper is a solid tool—fast, lightweight, you can customize everything. But after a while, I realized something: Reaper tells you “you can do anything you want,” but it also tells you “you figure out how to do it.” Freedom is nice, but some days you just want the tool to tell you something. I used to say, I have to do everything. As I get older, I realize that the best method is to handle the critical points.
Then I met a DAW called Bitwig.
My first reaction was, “It’s just another DAW.” But it isn’t.
FL Studio is a studio; Reaper is an editor. Bitwig is something else—it’s like a sound IDE. In DAWs, you record and arrange audio. In Bitwig, you write sound. There’s The Grid, there’s a modulation system, everything can be connected to everything. (Yes, if you push it, you can even create digital pets that live solely on sound.) This is the architect’s logic: you know what the components do, you know why they are there, and when you want to change something, you know exactly where to touch.
It’s like opening a terminal. It’s not an office program.
But why was I looking for an IDE anyway?
My ways of self-expression converge on three axes: visual, auditory, and mental. TouchDesigner handles the visual side—real-time visual systems, creativity for the eye. Rust handles the mental side—thinking, designing, understanding the internal mechanics of a thing. The auditory side remained empty for a long time. The tool was there, but it felt like a tool—you’d run something, get an output, but you weren’t inside the system.
Bitwig closed the auditory axis. Now, all three areas operate with the same mindset: write, connect, audit, modify. They are all IDE logic.
So, what am I going to explain in this post?
I thought about it for a while. FabFilter EQ4? Compressors? Mixdown techniques? I could write about all of these, but as a first post about Bitwig, those would be the wrong doors to open. Because EQs and compressors are in every DAW. Writing about them specifically in Bitwig is like starting a Rust article by explaining “how to define a variable.”
What is unique to Bitwig is The Grid.
The Grid is the modular sound design environment embedded within Bitwig. Oscillators, filters, modulators, envelopes—you connect them all yourself. There are no presets, no “right way,” no “this is how it’s done.” There is only signal, and you.
What is The Grid
When you open a normal synth plugin, you’re presented with something pre-made. There’s a filter, an ADSR, an LFO—all already connected. You just turn the knobs. But the designer of that synthesizer has already decided which signal goes where. You are living inside those decisions.
In The Grid, there’s no such thing. You open a blank canvas. You place an OSC (oscillator) module, a Filter module, and you pull a cable between them. Sound comes out. Then you add an Envelope and connect it to the filter’s cutoff frequency. Now the filter opens and closes. You put an LFO on top and connect it to the pitch—the wobbling starts.
It’s that simple. And it’s that deep.
Because in The Grid, everything is signal. Audio is signal, modulation is signal, MIDI notes are signal. And signals can be freely connected to one another. You can connect an LFO to the rate of another LFO. You can connect the output of an envelope to the trigger of another envelope. You can use an audio signal as a modulation source.
This is modular thinking: what happens when the signal goes there?
You don’t ask this question in a normal plugin. In The Grid, there are no other questions.
Let’s Design a Bass
In industrial trance, the bass is the lead. The melody isn’t something separate; the bass is the melody. The rhythm is there, too. The character is there, too. Everything is there. Therefore, the bass must have harmonic content, low-frequency power, and character.
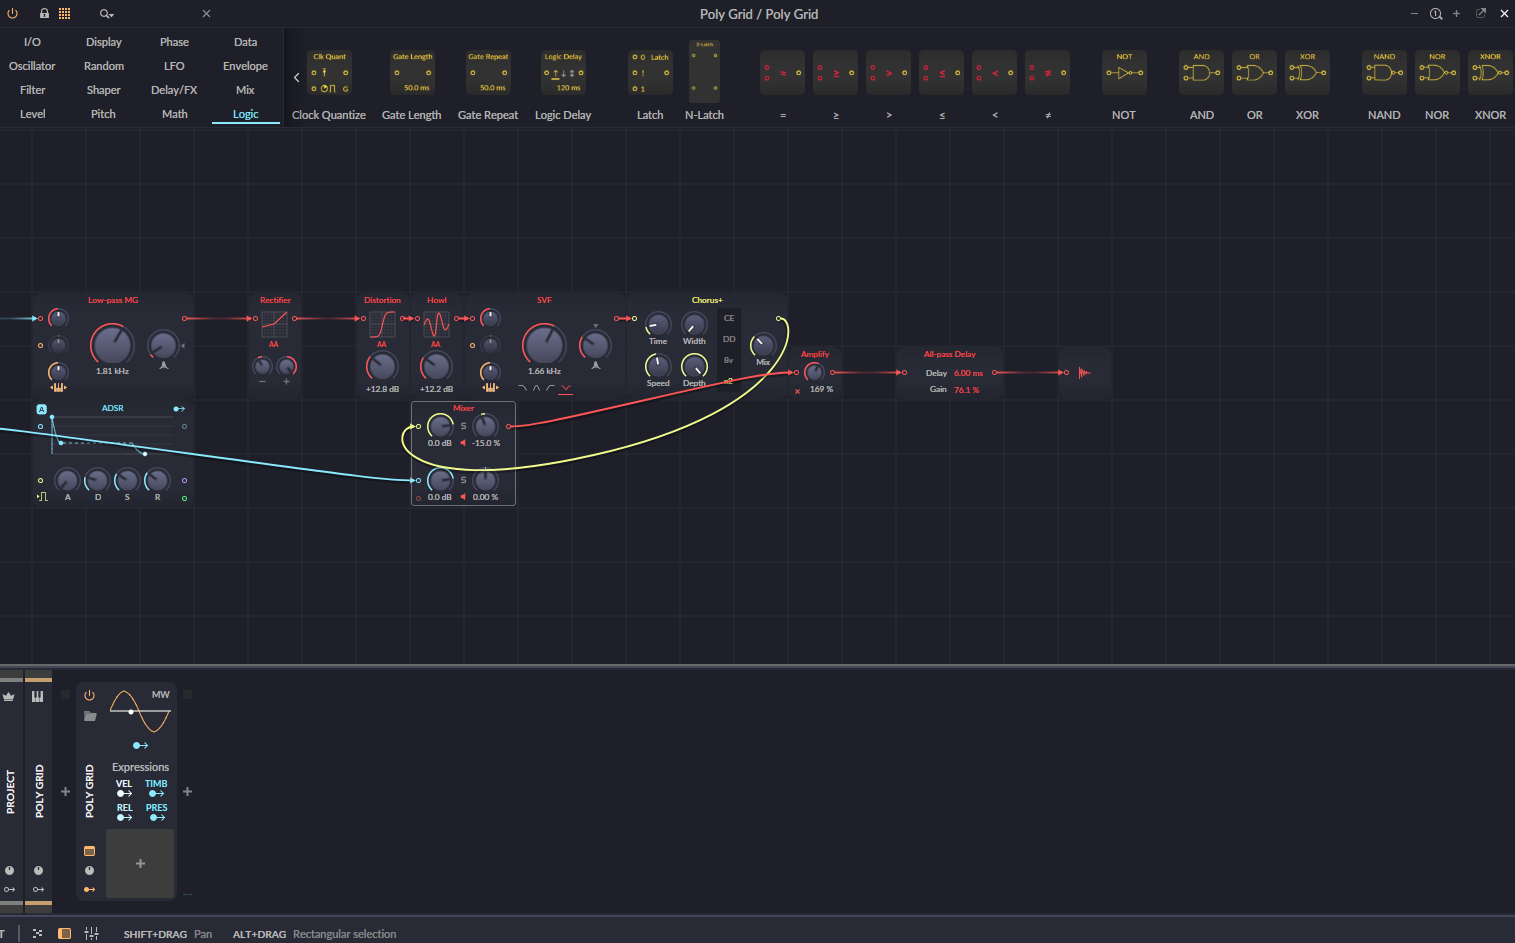
We will build this using a two-layer structure:
- OSC 1 — Sawtooth, the main harmonic layer
- Sub OSC — Sine, one octave down, does not pass through the filter
It’s important that the sub doesn’t pass through the filter. As you perform a filter sweep, the sub remains clean—the low-frequency punch isn’t lost.
Step 1 — OSC 1: Sawtooth
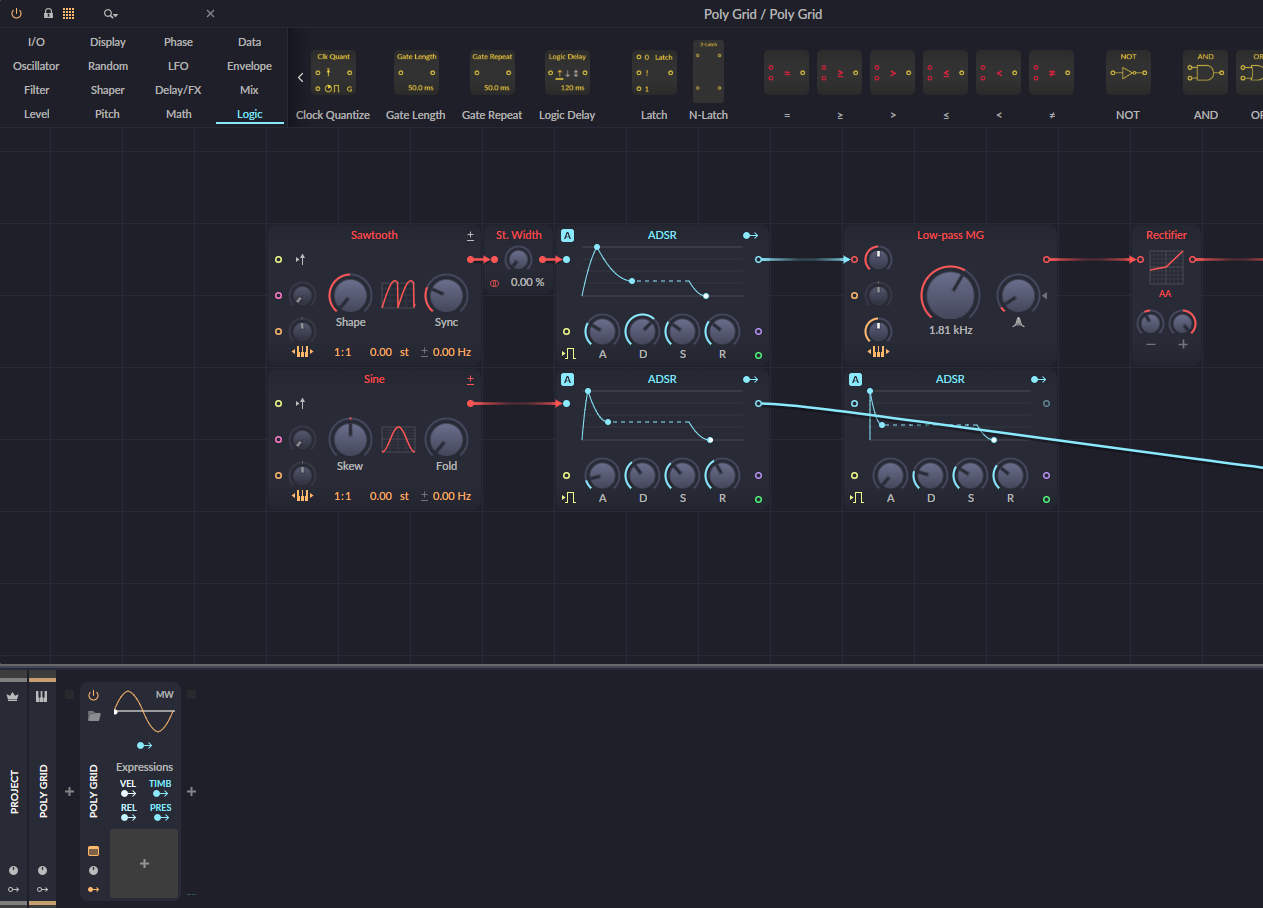
We open The Grid and place the first module: OSC, waveform Sawtooth.
The reason we choose Sawtooth is simple: it contains all harmonics. Odd, even, all of them. This means giving the filter material—the more harmonics the filter finds, the more it can shape. If we had placed a Sine, turning the filter would be pointless; there are no harmonics to begin with.
Connect the Note Pitch output to the OSC’s pitch input. Otherwise, the bass plays at a constant note and won’t respond to the keyboard.
The sound is still raw. Good. That’s where we start.
Step 2 — Sub: Sine
Not a second oscillator, but a separate layer. Sine waveform, one octave down. The sub’s job isn’t harmonic content—it’s just low-frequency mass. The Sawtooth was full of harmonics; the Sine is the exact opposite: it’s just the fundamental frequency, nothing else. Clean, round, like gravity.
This layer does not enter the distortion chain. It doesn’t touch the Rectifier, the Distortion, or the Howl. It’s connected directly to its own ADSR, joining the Saw at the final mixer. If you dirty the Sub, the low-frequency power is lost—you get muddiness instead of punch.
ADSR: Slightly lower attack and decay than the Saw’s ADSR. The Sub needs to lag slightly behind. If both exploded at the same time, the low end would rattle the mix at the start of every note. Lagging behind supports the low end without pushing it to the front—this difference is critical.
Step 3 — LP MG: Moog Ladder Filter
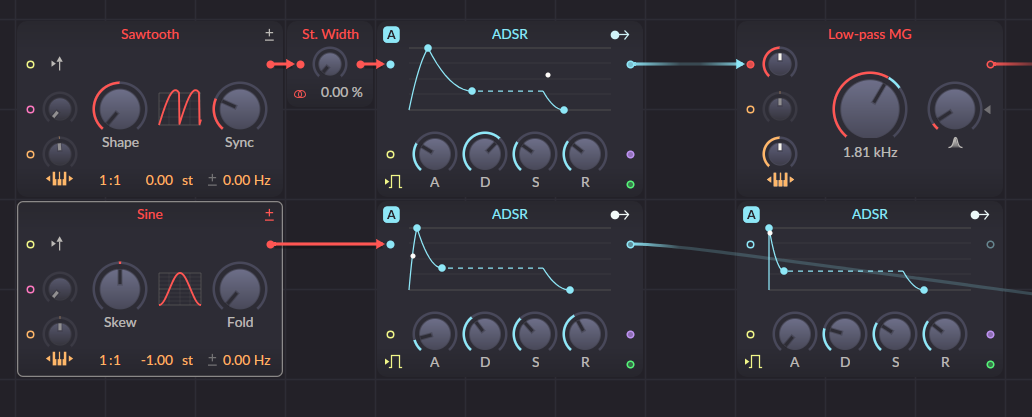
LP MG stands for “Low Pass Moog.” The ladder filter circuit designed by Bob Moog in the 1960s—named after the circuit structure where transistors are arranged like a ladder. Each pair of transistors creates a pole; four poles together give a 24dB/octave cutoff slope (6x4=24). In an analog circuit, the inherent saturation of the transistors produces that “warm” timbre in the filter.
In digital, this circuit is simulated. The LP MG in The Grid mimics that same character.
Here, the LP MG has its own filter envelope: attack zero, short decay. What does the filter envelope do? It moves the cutoff frequency over time. When the attack is zero, the filter opens fully at the start of the note—letting all harmonics pass. When the decay is short, the filter closes quickly—harmonics decrease, the sound darkens. Brightness at the beginning, followed by rapid darkening. That “mechanical breath” feel of industrial comes exactly from there.
Step 4 — Rectifier → Distortion → Howl
The sound coming out of the LP MG isn’t clean, but it isn’t aggressive yet either. Now, the three-stage saturation chain begins.
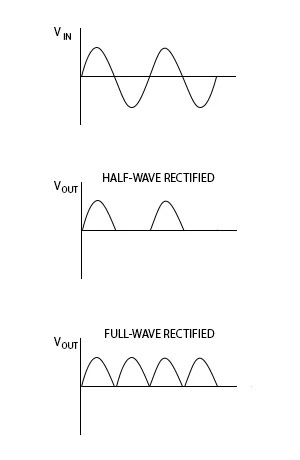
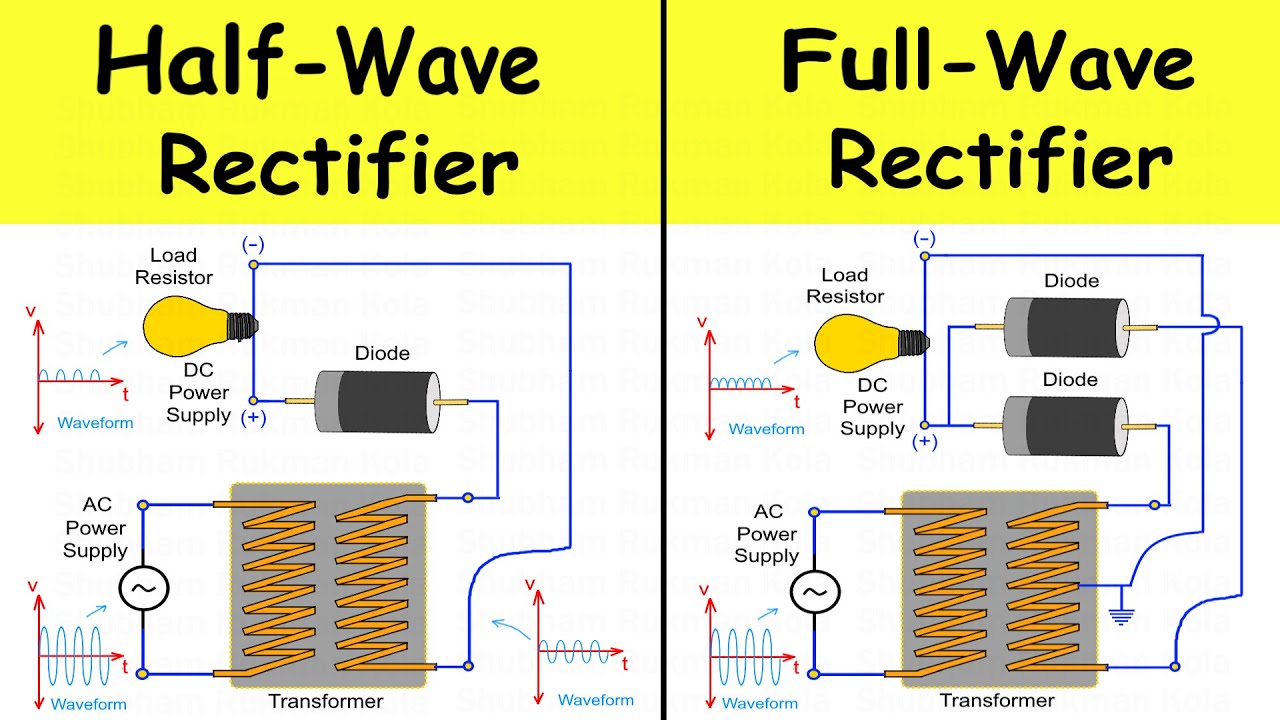
Rectifier: In the real world, this is done with diodes (rectifier diodes). A diode is an electronic component that allows current to pass in only one direction. If you place one diode, you cut the negative half of the wave—half-wave rectification. If you use a four-diode bridge, you flip the negative half to positive—full-wave rectification. What happens? The frequency of the wave doubles, even harmonics become prominent. The sound starts to feel “folded.” It’s frequently used in guitar pedals and synthesizer circuits.
The Rectifier module in The Grid does exactly this. It takes the signal, folds the negative half—harmonic content suddenly doubles.
Distortion: It pushes the signal enriched by the Rectifier even further. In an analog circuit, this happens by driving a transistor or op-amp outside its linear operating region (e.g., driving an OTA with more mV than it can accept). When the transistor begins to clip, the wave becomes angled, and harmonic content increases. Saturation is “softer” in tube amplifiers (even harmonics, warm), and sharper in transistors (odd harmonics, aggressive). In EBM and industrial, we want that transistor sharpness.
Howl: The final saturation layer. It keeps all the dirt together, making the sound “consistent.” Three-stage layered saturation—Rectifier, Distortion, Howl—is the digital equivalent of Gessafelstein’s metallic, layered distortion texture.
Step 5 — SVF Notch + Chorus
The sound coming out of the distortion chain is harmonically very dense. Every frequency is jostling at the same time. SVF (State Variable Filter) in Notch mode, 1.6kHz.
In analog circuits, SVF is built with op-amps, producing low-pass, high-pass, band-pass, and notch signals simultaneously at the output—which one you use is up to you. A notch filter cuts that frequency and leaves the rest. 1.6kHz is the upper midrange—the region where the human ear is most sensitive. Cutting there doesn’t “soften” the sound; instead, it creates a strange void. That “hollow,” metallic, slightly inhuman character in industrial comes from here. The ear looks for that region and can’t find it—the sound is familiar, but it isn’t.
Then, Chorus, x2. Analog chorus works with a chain of capacitors called a BBD (Bucket Brigade Device)—the signal is passed from capacitor to capacitor to create a short delay line, which is then slightly modulated. The chorus of the Roland Juno synthesizers was made with this circuit; that characteristic wide sound comes from there.
Normally, chorus is controversial for industrial bass—it can soften it and cause a loss of sharpness. But here, the SVF notch has already preserved that sharpness. The Chorus only adds stereo width—instead of a single point, the sound spreads out in space.
Step 6 — Mixer, Amplify, All-pass Delay
The chorus output and the sine sub meet here. The sub arrived clean, the saw came through the entire chain. When they combine in the mixer, the layers are heard separately: the sub carries the mass, the saw carries the character. One doesn’t get in the way of the other’s job.
Amplify is the final gain setting.
All-pass Delay is the final stage. An all-pass filter is made in an analog circuit with an op-amp feedback configuration. It’s an interesting circuit: it doesn’t change the frequency response; it treats all frequencies equally. But it shifts the phase. The practical effect: the sensation of “where the sound sits” changes. The frequency is the same, the energy is the same, but the spatial perception shifts. A small but present depth—making the sound sit in “its own place” within the mix.
Conclusion
The patch is complete. A sawtooth, a sine sub, three layers of saturation, a notch filter, chorus, and a mixer that brings it all together at the end. Every component has a reason; every decision can be explained.
This is the beauty of The Grid: you know what you are doing and why. You aren’t opening a preset and turning a knob—you are constructing a signal. You are using a digital simulation of analog circuits, but the physics behind those circuits still apply. The diode in the Rectifier, the transistor in the ladder filter, the capacitor chain in the BBD chorus—it’s all here, just as software.
In the continuation of this series (perhaps), I will delve into pitch modulation with LFOs, detune techniques, and more advanced sound design topics. A little darker, a little deeper.
In the meantime, you can download the patch and open it directly in Bitwig:
EOF.